-
1. 起步
-
2. Git 基礎
-
3. Git 分支
-
4. 伺服器上的 Git
- 4.1 協定
- 4.2 在伺服器上取得 Git
- 4.3 產生您的 SSH 公開金鑰
- 4.4 設定伺服器
- 4.5 Git Daemon
- 4.6 智慧型 HTTP
- 4.7 GitWeb
- 4.8 GitLab
- 4.9 第三方託管選項
- 4.10 總結
-
5. 分散式 Git
-
A1. 附錄 A:其他環境中的 Git
- A1.1 圖形介面
- A1.2 Visual Studio 中的 Git
- A1.3 Visual Studio Code 中的 Git
- A1.4 IntelliJ / PyCharm / WebStorm / PhpStorm / RubyMine 中的 Git
- A1.5 Sublime Text 中的 Git
- A1.6 Bash 中的 Git
- A1.7 Zsh 中的 Git
- A1.8 PowerShell 中的 Git
- A1.9 總結
-
A2. 附錄 B:將 Git 嵌入您的應用程式
-
A3. 附錄 C:Git 命令
8.2 自訂 Git - Git 屬性
Git 屬性
其中一些設定也可以針對路徑指定,以便 Git 僅將這些設定套用於子目錄或檔案子集。這些特定於路徑的設定稱為 Git 屬性,並在您的一個目錄(通常是專案的根目錄)中的 .gitattributes 檔案中設定,如果您不希望屬性檔案與您的專案一起提交,則在 .git/info/attributes 檔案中設定。
使用屬性,您可以執行諸如為專案中的個別檔案或目錄指定單獨的合併策略、告訴 Git 如何比較非文字檔案,或讓 Git 在您簽入或簽出 Git 之前過濾內容等操作。在本節中,您將了解可以在 Git 專案中針對路徑設定的一些屬性,並查看一些在實踐中使用此功能的範例。
二進位檔案
您可以使用 Git 屬性的一個很酷的技巧是告訴 Git 哪些檔案是二進位的(在它可能無法判斷的情況下),並給 Git 關於如何處理這些檔案的特殊說明。例如,某些文字檔案可能是機器產生的且無法比較,而某些二進位檔案可以進行比較。您將了解如何告訴 Git 哪些是哪些。
識別二進位檔案
有些檔案看起來像文字檔案,但實際上應視為二進位資料。例如,macOS 上的 Xcode 專案包含一個以 .pbxproj 結尾的檔案,它基本上是 IDE 寫入磁碟的 JSON(純文字 JavaScript 資料格式)資料集,用於記錄您的建置設定等等。儘管它在技術上是一個文字檔案(因為它都是 UTF-8),但您不希望將其視為文字檔案,因為它實際上是一個輕量級資料庫 – 如果兩個人更改它,您就無法合併內容,並且差異通常沒有幫助。該檔案旨在由機器使用。從本質上講,您希望將其視為二進位檔案。
若要告訴 Git 將所有 pbxproj 檔案視為二進位資料,請將以下行新增至您的 .gitattributes 檔案
*.pbxproj binary現在,當您在專案上執行 git show 或 git diff 時,Git 不會嘗試轉換或修正 CRLF 問題;也不會嘗試計算或列印此檔案中變更的差異。
比較二進位檔案
您也可以使用 Git 屬性功能來有效比較二進位檔案。您可以透過告訴 Git 如何將二進位資料轉換為可透過正常差異比較比較的文字格式來完成此操作。
首先,您將使用此技術來解決人類已知最令人煩惱的問題之一:版本控制 Microsoft Word 文件。如果您想要版本控制 Word 文件,您可以將它們放在 Git 儲存庫中並偶爾提交;但這有什麼好處呢?如果您正常執行 git diff,您只會看到類似這樣的情況
$ git diff
diff --git a/chapter1.docx b/chapter1.docx
index 88839c4..4afcb7c 100644
Binary files a/chapter1.docx and b/chapter1.docx differ
除非您簽出並手動掃描,否則您無法直接比較兩個版本,對嗎?事實證明,您可以使用 Git 屬性相當好地完成此操作。將以下行放入您的 .gitattributes 檔案中
*.docx diff=word這會告訴 Git,任何符合此模式 (.docx) 的檔案,當您嘗試檢視包含變更的差異時,都應使用「word」篩選器。「word」篩選器是什麼?您必須進行設定。在這裡,您將設定 Git 使用 docx2txt 程式將 Word 文件轉換為可讀取的文字檔案,然後它將正確地比較差異。
首先,您需要安裝 docx2txt;您可以從 https://sourceforge.net/projects/docx2txt 下載。依照 INSTALL 檔案中的指示,將它放到您的 shell 可以找到的位置。接下來,您要編寫一個包裝腳本,將輸出轉換為 Git 期望的格式。建立一個名為 docx2txt 的檔案,並將其放在您的路徑中,然後加入以下內容
#!/bin/bash
docx2txt.pl "$1" -
別忘了對該檔案執行 chmod a+x。最後,您可以設定 Git 使用此腳本
$ git config diff.word.textconv docx2txt現在,Git 知道如果它嘗試比較兩個快照之間的差異,並且任何檔案的結尾是 .docx,它應該透過「word」篩選器執行這些檔案,該篩選器被定義為 docx2txt 程式。這實際上會在嘗試比較差異之前,建立您 Word 檔案的文字版本。
這是一個範例:本書的第 1 章被轉換為 Word 格式並提交到 Git 儲存庫中。然後新增了一個新的段落。以下是 git diff 顯示的內容
$ git diff
diff --git a/chapter1.docx b/chapter1.docx
index 0b013ca..ba25db5 100644
--- a/chapter1.docx
+++ b/chapter1.docx
@@ -2,6 +2,7 @@
 This chapter will be about getting started with Git. We will begin at the beginning by explaining some background on version control tools, then move on to how to get Git running on your system and finally how to get it setup to start working with. At the end of this chapter you should understand why Git is around, why you should use it and you should be all setup to do so.
 1.1. About Version Control
 What is "version control", and why should you care? Version control is a system that records changes to a file or set of files over time so that you can recall specific versions later. For the examples in this book you will use software source code as the files being version controlled, though in reality you can do this with nearly any type of file on a computer.
+Testing: 1, 2, 3.
 If you are a graphic or web designer and want to keep every version of an image or layout (which you would most certainly want to), a Version Control System (VCS) is a very wise thing to use. It allows you to revert files back to a previous state, revert the entire project back to a previous state, compare changes over time, see who last modified something that might be causing a problem, who introduced an issue and when, and more. Using a VCS also generally means that if you screw things up or lose files, you can easily recover. In addition, you get all this for very little overhead.
 1.1.1. Local Version Control Systems
 Many people's version-control method of choice is to copy files into another directory (perhaps a time-stamped directory, if they're clever). This approach is very common because it is so simple, but it is also incredibly error prone. It is easy to forget which directory you're in and accidentally write to the wrong file or copy over files you don't mean to.
Git 成功且簡潔地告訴我們新增了字串「Testing: 1, 2, 3.」,這是正確的。它並不完美 – 格式變更不會在這裡顯示 – 但它確實有效。
您可以用這種方式解決的另一個有趣的問題是比較影像檔案的差異。其中一種方法是透過篩選器執行影像檔案,該篩選器會擷取其 EXIF 資訊 – 大多數影像格式都會記錄的中繼資料。如果您下載並安裝 exiftool 程式,則可以使用它將影像轉換為有關中繼資料的文字,因此至少差異會向您顯示任何發生的變更的文字表示。將以下行放入您的 .gitattributes 檔案中
*.png diff=exif設定 Git 使用此工具
$ git config diff.exif.textconv exiftool如果您替換專案中的影像並執行 git diff,您會看到類似這樣的內容
diff --git a/image.png b/image.png
index 88839c4..4afcb7c 100644
--- a/image.png
+++ b/image.png
@@ -1,12 +1,12 @@
 ExifTool Version Number         : 7.74
-File Size                       : 70 kB
-File Modification Date/Time     : 2009:04:21 07:02:45-07:00
+File Size                       : 94 kB
+File Modification Date/Time     : 2009:04:21 07:02:43-07:00
 File Type                       : PNG
 MIME Type                       : image/png
-Image Width                     : 1058
-Image Height                    : 889
+Image Width                     : 1056
+Image Height                    : 827
 Bit Depth                       : 8
 Color Type                      : RGB with Alpha
您可以輕易地看到檔案大小和影像尺寸都已變更。
關鍵字展開
使用過這些系統的開發人員經常要求使用 SVN 或 CVS 樣式的關鍵字展開。在 Git 中,這的主要問題是您無法在提交後使用關於提交的資訊來修改檔案,因為 Git 會先檢查檔案的總和。但是,您可以在簽出檔案時將文字注入檔案中,並在將其新增到提交之前再次移除。Git 屬性提供您兩種方法來執行此操作。
首先,您可以將 blob 的 SHA-1 總和自動注入檔案中的 $Id$ 欄位中。如果您在檔案或一組檔案上設定此屬性,則下次簽出該分支時,Git 會將該欄位替換為 blob 的 SHA-1。請務必注意,它不是提交的 SHA-1,而是 blob 本身的 SHA-1。將以下行放入您的 .gitattributes 檔案中
*.txt ident將 $Id$ 參考新增到測試檔案
$ echo '$Id$' > test.txt下次您簽出此檔案時,Git 會注入 blob 的 SHA-1
$ rm test.txt
$ git checkout -- test.txt
$ cat test.txt
$Id: 42812b7653c7b88933f8a9d6cad0ca16714b9bb3 $
但是,該結果的用途有限。如果您在 CVS 或 Subversion 中使用過關鍵字替換,則可以包含時間戳記 – SHA-1 並沒有那麼有用,因為它是相當隨機的,而且您無法僅透過查看它們來判斷一個 SHA-1 是比另一個 SHA-1 新還是舊。
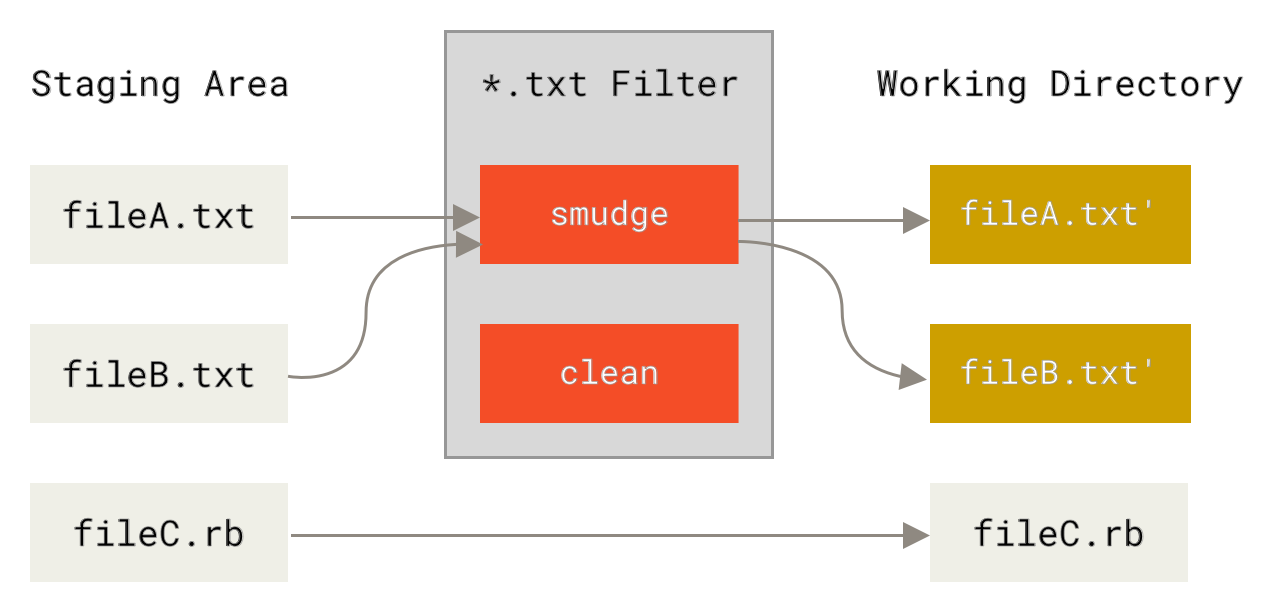
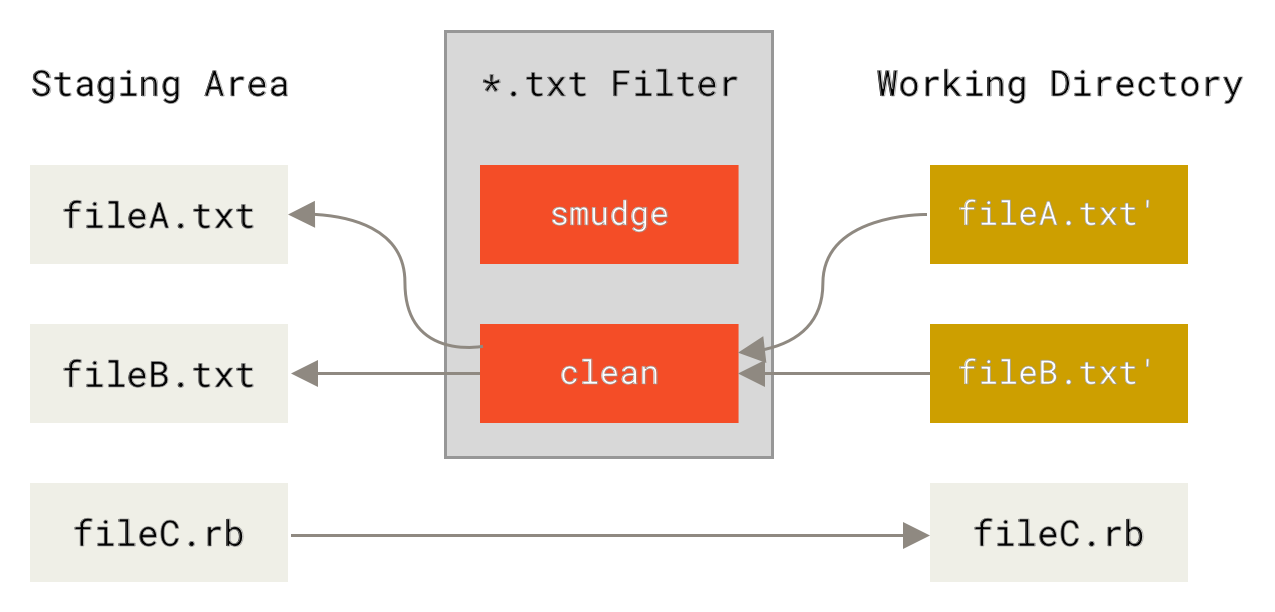
事實證明,您可以編寫自己的篩選器,以便在提交/簽出時對檔案執行替換。這些稱為「clean」和「smudge」篩選器。在 .gitattributes 檔案中,您可以為特定的路徑設定篩選器,然後設定腳本,以便在簽出檔案之前(「smudge」,請參閱 「smudge」篩選器在簽出時執行)以及在暫存檔案之前(「clean」,請參閱 「clean」篩選器在檔案暫存時執行)處理檔案。這些篩選器可以設定為執行各種有趣的事情。
此功能的原始提交訊息提供了一個簡單的範例,說明如何在提交之前透過 indent 程式執行所有 C 原始碼。您可以在 .gitattributes 檔案中設定篩選器屬性,以使用「indent」篩選器篩選 \*.c 檔案來設定它
*.c filter=indent然後,告訴 Git 「indent」篩選器在 smudge 和 clean 時執行什麼操作
$ git config --global filter.indent.clean indent
$ git config --global filter.indent.smudge cat
在這種情況下,當您提交與 *.c 匹配的檔案時,Git 會在暫存這些檔案之前透過 indent 程式執行它們,然後在將它們簽回磁碟之前透過 cat 程式執行它們。cat 程式基本上不執行任何操作:它會吐出它所接收的相同資料。此組合實際上會在提交之前透過 indent 篩選所有 C 原始碼檔案。
另一個有趣的範例會取得 $Date$ 關鍵字展開,RCS 樣式。為了正確地執行此操作,您需要一個小型腳本,該腳本會取得檔案名稱,找出此專案的上次提交日期,並將日期插入檔案中。這是一個執行此操作的小型 Ruby 腳本
#! /usr/bin/env ruby
data = STDIN.read
last_date = `git log --pretty=format:"%ad" -1`
puts data.gsub('$Date$', '$Date: ' + last_date.to_s + '$')
此腳本所做的只是從 git log 命令取得最新的提交日期,將該日期貼入它在 stdin 中看到的任何 $Date$ 字串中,然後列印結果 – 使用您最熟悉的任何語言都應該很容易做到。您可以將此檔案命名為 expand_date 並將其放在您的路徑中。現在,您需要在 Git 中設定一個篩選器(稱之為 dater),並告知它在簽出時使用您的 expand_date 篩選器來 smudge 檔案。您將使用 Perl 運算式在提交時清除它
$ git config filter.dater.smudge expand_date
$ git config filter.dater.clean 'perl -pe "s/\\\$Date[^\\\$]*\\\$/\\\$Date\\\$/"'
此 Perl 片段會去除它在 $Date$ 字串中看到的任何內容,以便回到您開始的位置。現在您的篩選器已準備就緒,您可以透過設定該檔案的 Git 屬性來測試它,該屬性會啟用新的篩選器並建立帶有 $Date$ 關鍵字的檔案
date*.txt filter=dater$ echo '# $Date$' > date_test.txt如果您提交這些變更並再次簽出該檔案,您會看到關鍵字已正確替換
$ git add date_test.txt .gitattributes
$ git commit -m "Test date expansion in Git"
$ rm date_test.txt
$ git checkout date_test.txt
$ cat date_test.txt
# $Date: Tue Apr 21 07:26:52 2009 -0700$
您可以看到此技術對於自訂應用程式的功能有多強大。不過,您必須小心,因為 .gitattributes 檔案會與專案一起提交和傳遞,但是驅動程式(在此例中為 dater)不會,因此它不會在任何地方都有效。當您設計這些篩選器時,它們應該能夠順利失敗,並且專案仍然可以正常運作。
匯出您的儲存庫
Git 屬性資料也允許您在匯出專案封存檔時執行一些有趣的操作。
export-ignore
您可以告知 Git 在產生封存檔時不要匯出某些檔案或目錄。如果您有不想包含在專案的 tarball 匯出中,但想要簽入專案的子目錄或檔案,則可以透過 export-ignore 屬性來判斷這些檔案。
例如,假設您在 test/ 子目錄中有一些測試檔案,並且將它們包含在專案的 tarball 匯出中沒有意義。您可以將以下行新增到您的 Git 屬性檔案中
test/ export-ignore現在,當您執行 git archive 來建立專案的 tarball 時,該目錄將不會包含在封存檔中。
export-subst
在匯出用於部署的檔案時,您可以將 git log 的格式設定和關鍵字展開處理套用至標記有 export-subst 屬性的檔案的選定部分。
例如,如果您想要在專案中包含一個名為 LAST_COMMIT 的檔案,並在 git archive 執行時自動將有關上次提交的中繼資料注入其中,您可以設定 .gitattributes 和 LAST_COMMIT 檔案,如下所示
LAST_COMMIT export-subst$ echo 'Last commit date: $Format:%cd by %aN$' > LAST_COMMIT
$ git add LAST_COMMIT .gitattributes
$ git commit -am 'adding LAST_COMMIT file for archives'當您執行 git archive 時,封存檔案的內容會如下所示
$ git archive HEAD | tar xCf ../deployment-testing -
$ cat ../deployment-testing/LAST_COMMIT
Last commit date: Tue Apr 21 08:38:48 2009 -0700 by Scott Chacon
替換可以包含例如提交訊息和任何 git notes,並且 git log 可以執行簡單的文字換行
$ echo '$Format:Last commit: %h by %aN at %cd%n%+w(76,6,9)%B$' > LAST_COMMIT
$ git commit -am 'export-subst uses git log'\''s custom formatter

git archive uses git log'\''s `pretty=format:` processor
directly, and strips the surrounding `$Format:` and `$`
markup from the output.
'
$ git archive @ | tar xfO - LAST_COMMIT
Last commit: 312ccc8 by Jim Hill at Fri May 8 09:14:04 2015 -0700
       export-subst uses git log's custom formatter

         git archive uses git log's `pretty=format:` processor directly, and
         strips the surrounding `$Format:` and `$` markup from the output.
產生的封存檔適合用於部署工作,但是與任何匯出的封存檔一樣,它不適合用於進一步的開發工作。
合併策略
您也可以使用 Git 屬性來告知 Git 對專案中的特定檔案使用不同的合併策略。一個非常有用的選項是告知 Git 在發生衝突時不要嘗試合併特定檔案,而是使用您這一邊的合併來覆蓋其他人的合併。
如果專案中的分支已分歧或已專業化,但您想要能夠從中合併回變更,並且想要忽略某些檔案,這會很有幫助。假設您有一個資料庫設定檔名為 database.xml,它在兩個分支中是不同的,並且您想要合併到另一個分支中,而不會弄亂資料庫檔案。您可以設定類似這樣的屬性
database.xml merge=ours然後使用
$ git config --global merge.ours.driver true如果您合併到另一個分支中,您會看到類似這樣的內容,而不是 database.xml 檔案發生合併衝突
$ git merge topic
Auto-merging database.xml
Merge made by recursive.在這種情況下,database.xml 會保留在您最初擁有的任何版本。