-
1. 開始
-
2. Git 基礎
-
3. Git 分支
-
4. 伺服器上的 Git
- 4.1 協定
- 4.2 在伺服器上取得 Git
- 4.3 產生您的 SSH 公開金鑰
- 4.4 設定伺服器
- 4.5 Git Daemon
- 4.6 智慧 HTTP
- 4.7 GitWeb
- 4.8 GitLab
- 4.9 第三方託管選項
- 4.10 總結
-
5. 分散式 Git
-
A1. 附錄 A:其他環境中的 Git
- A1.1 圖形化介面
- A1.2 Visual Studio 中的 Git
- A1.3 Visual Studio Code 中的 Git
- A1.4 IntelliJ / PyCharm / WebStorm / PhpStorm / RubyMine 中的 Git
- A1.5 Sublime Text 中的 Git
- A1.6 Bash 中的 Git
- A1.7 Zsh 中的 Git
- A1.8 PowerShell 中的 Git
- A1.9 總結
-
A2. 附錄 B:將 Git 嵌入您的應用程式
-
A3. 附錄 C:Git 命令
3.2 Git 分支 - 基本分支與合併
基本分支與合併
讓我們透過一個您可能在現實世界中使用的簡單分支與合併工作流程範例。您將遵循以下步驟:
-
在網站上進行一些工作。
-
為您正在處理的新使用者故事建立分支。
-
在該分支中進行一些工作。
在此階段,您會接到電話,得知另一個問題很嚴重,需要進行緊急修復。您將執行以下操作:
-
切換到您的生產分支。
-
建立一個分支以新增緊急修復。
-
測試完成後,合併緊急修復分支並推送到生產環境。
-
切換回您的原始使用者故事並繼續工作。
基本分支
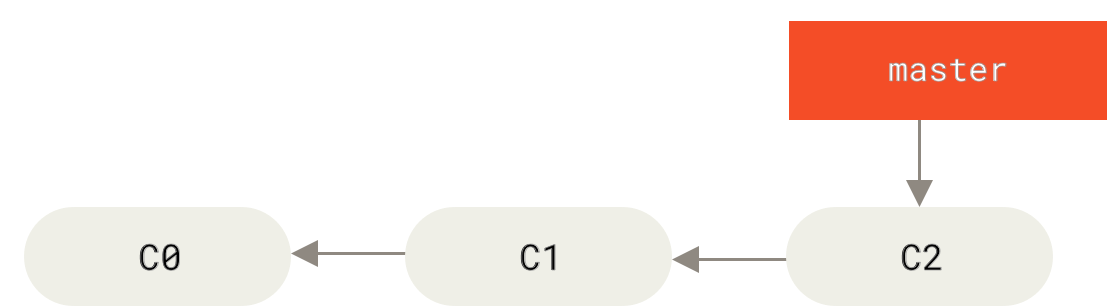
首先,假設您正在處理您的專案,並且在 master 分支上已經有幾個提交。
您已決定要處理您公司使用的任何問題追蹤系統中的問題 #53。要建立新分支並同時切換到該分支,您可以執行帶有 -b 參數的 git checkout 命令:
$ git checkout -b iss53
Switched to a new branch "iss53"
這是以下命令的簡寫:
$ git branch iss53
$ git checkout iss53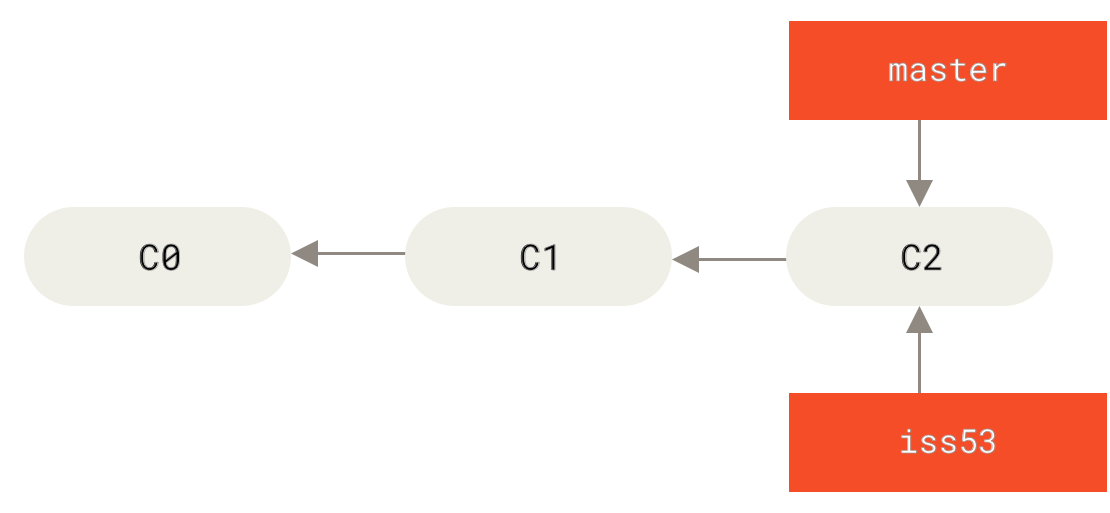
您在網站上工作並進行一些提交。這樣做會使 iss53 分支向前移動,因為您已將其檢出(也就是說,您的 HEAD 指向它):
$ vim index.html
$ git commit -a -m 'Create new footer [issue 53]'
iss53 分支隨著您的工作向前移動現在你接到通知,網站出現問題,需要立即修復。有了 Git,你無需將修復程式碼與你所做的 iss53 變更一起部署,也不必費力還原這些變更,才能將修復程式碼套用到正式環境。你只需切換回你的 master 分支即可。
但是,在你執行此操作之前,請注意,如果你的工作目錄或暫存區有未提交的變更,而這些變更與你正在簽出的分支衝突,Git 將不允許你切換分支。切換分支時,最好保持一個乾淨的工作狀態。有一些方法可以解決這個問題(即,隱藏和提交修改),我們將在後面的 隱藏和清理 中介紹。現在,我們假設你已經提交了所有變更,因此你可以切換回你的 master 分支。
$ git checkout master
Switched to branch 'master'
此時,你的專案工作目錄與你開始處理問題 #53 之前完全一樣,你可以專注於你的熱修復。這是一個需要記住的重點:當你切換分支時,Git 會將你的工作目錄重設為你上次在該分支上提交時的樣子。它會自動新增、移除和修改檔案,以確保你的工作副本與該分支上次提交時的狀態一致。
接下來,你需要進行熱修復。讓我們建立一個 hotfix 分支,以便在這個分支上工作,直到完成為止。
$ git checkout -b hotfix
Switched to a new branch 'hotfix'
$ vim index.html
$ git commit -a -m 'Fix broken email address'
[hotfix 1fb7853] Fix broken email address
 1 file changed, 2 insertions(+)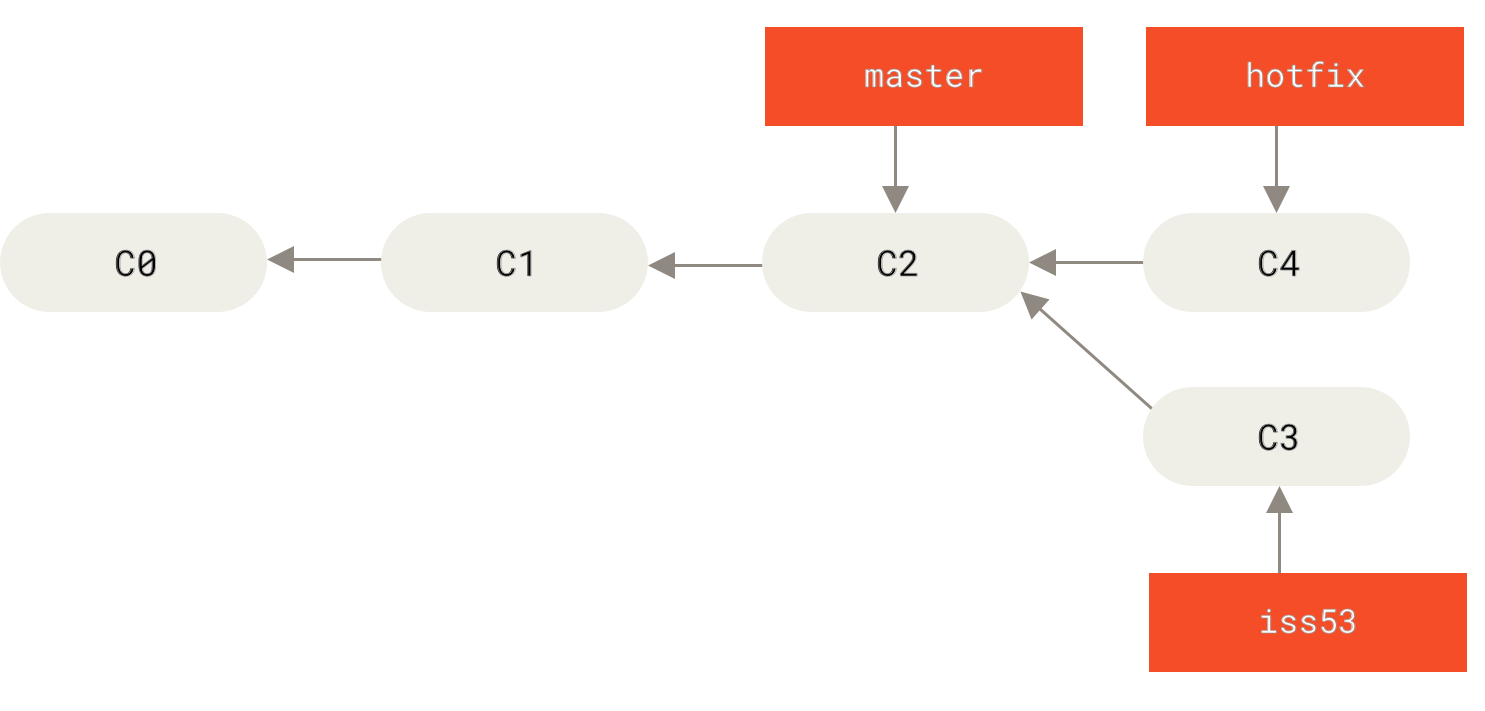
master 的熱修復分支你可以執行測試,確保熱修復是你想要的,最後將 hotfix 分支合併回你的 master 分支,以便部署到正式環境。你可以使用 git merge 命令來完成此操作。
$ git checkout master
$ git merge hotfix
Updating f42c576..3a0874c
Fast-forward
 index.html | 2 ++
 1 file changed, 2 insertions(+)
你會注意到合併中出現了「快轉」這個詞。由於你合併的 hotfix 分支指向的提交 C4 直接位於你目前所在的提交 C2 之前,因此 Git 只是將指標向前移動。換句話說,當你嘗試將一個提交與可以透過追蹤第一個提交的歷史記錄到達的提交合併時,Git 會簡化操作,直接將指標向前移動,因為沒有需要合併的分歧工作,這稱為「快轉」。
你的變更現在位於 master 分支所指向的提交快照中,你可以部署修復程式碼。
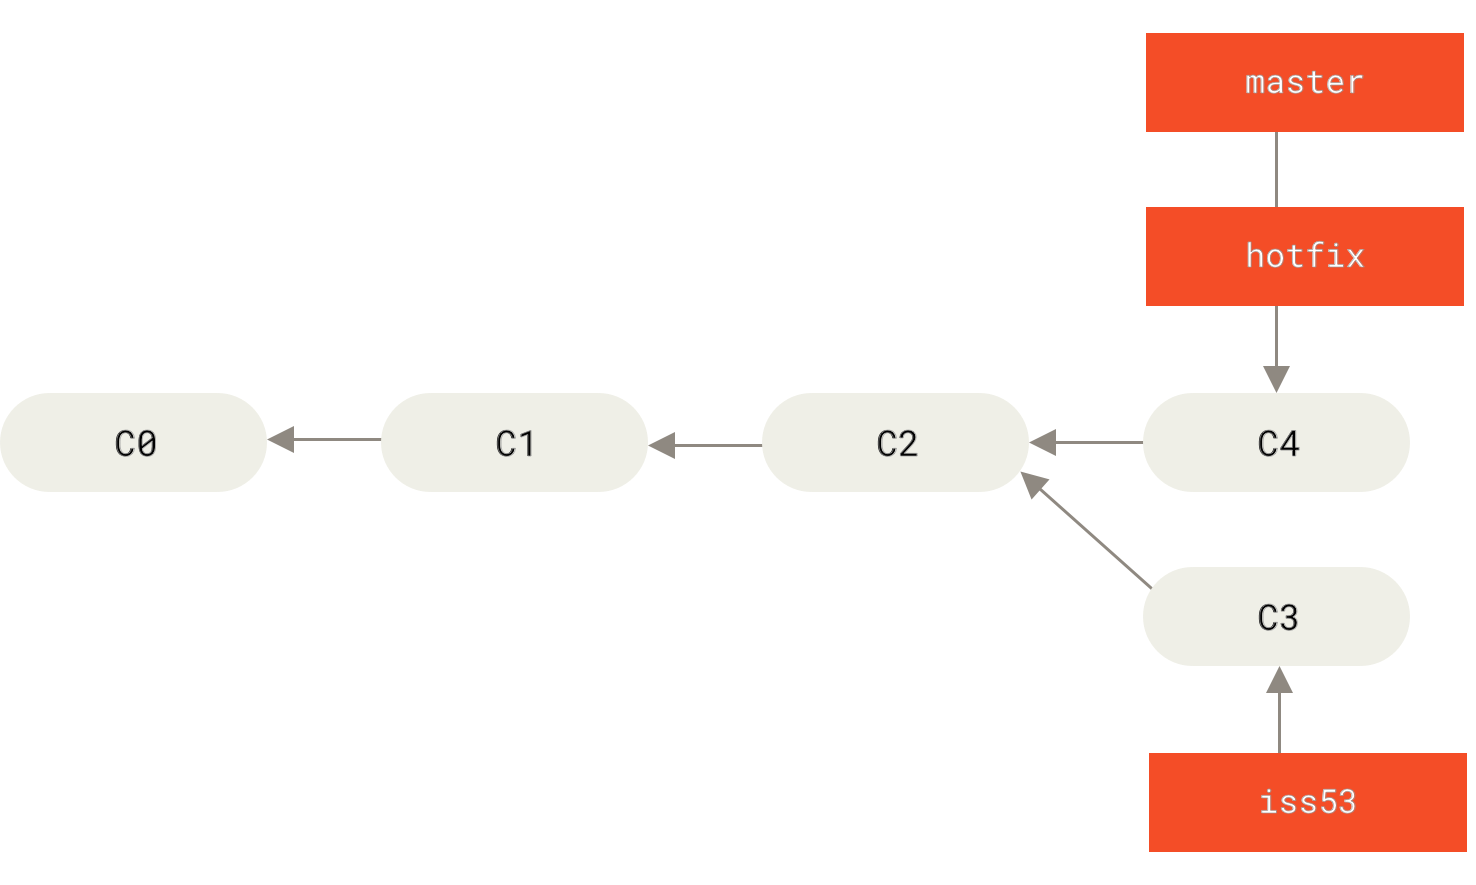
master 快轉到 hotfix在你部署超重要的修復程式碼後,你可以準備切換回你之前中斷的工作。但是,首先你將刪除 hotfix 分支,因為你不再需要它了,master 分支指向相同的位置。你可以使用 git branch 的 -d 選項來刪除它。
$ git branch -d hotfix
Deleted branch hotfix (3a0874c).
現在你可以切換回你在問題 #53 上的進行中的分支,並繼續處理它。
$ git checkout iss53
Switched to branch "iss53"
$ vim index.html
$ git commit -a -m 'Finish the new footer [issue 53]'
[iss53 ad82d7a] Finish the new footer [issue 53]
1 file changed, 1 insertion(+)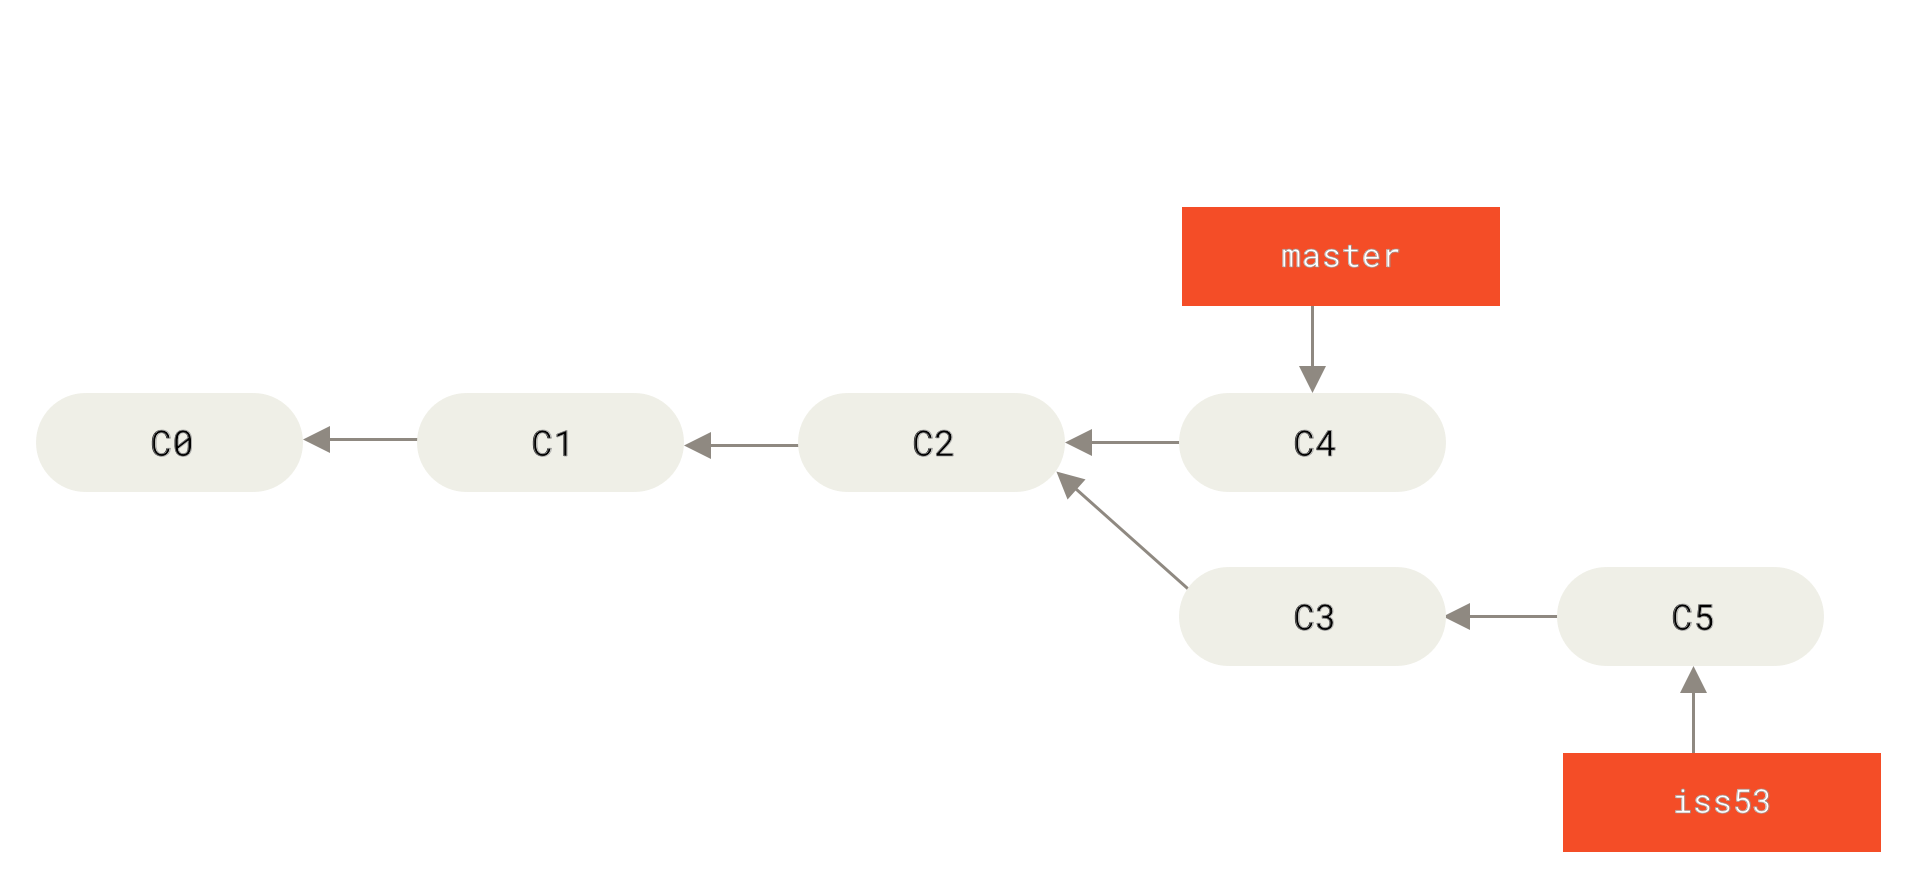
iss53 上繼續工作這裡值得注意的是,你在 hotfix 分支中所做的工作不會包含在 iss53 分支的檔案中。如果你需要將其拉取進來,你可以將你的 master 分支合併到你的 iss53 分支中,方法是執行 git merge master,或者你可以等到你決定稍後將 iss53 分支拉回 master 時再整合這些變更。
基本合併
假設你已確定你的問題 #53 工作已完成,並準備好合併到你的 master 分支。為了做到這一點,你將像之前合併 hotfix 分支一樣,將你的 iss53 分支合併到 master 中。你只需簽出你想要合併到的分支,然後執行 git merge 命令。
$ git checkout master
Switched to branch 'master'
$ git merge iss53
Merge made by the 'recursive' strategy.
index.html |    1 +
1 file changed, 1 insertion(+)
這看起來與你之前所做的 hotfix 合併有些不同。在這種情況下,你的開發歷史從某個較早的時間點分歧了。由於你所在分支的提交並不是你正在合併的分支的直接祖先,因此 Git 必須做一些工作。在這種情況下,Git 會執行簡單的三向合併,使用分支尖端指向的兩個快照以及兩者的共同祖先。
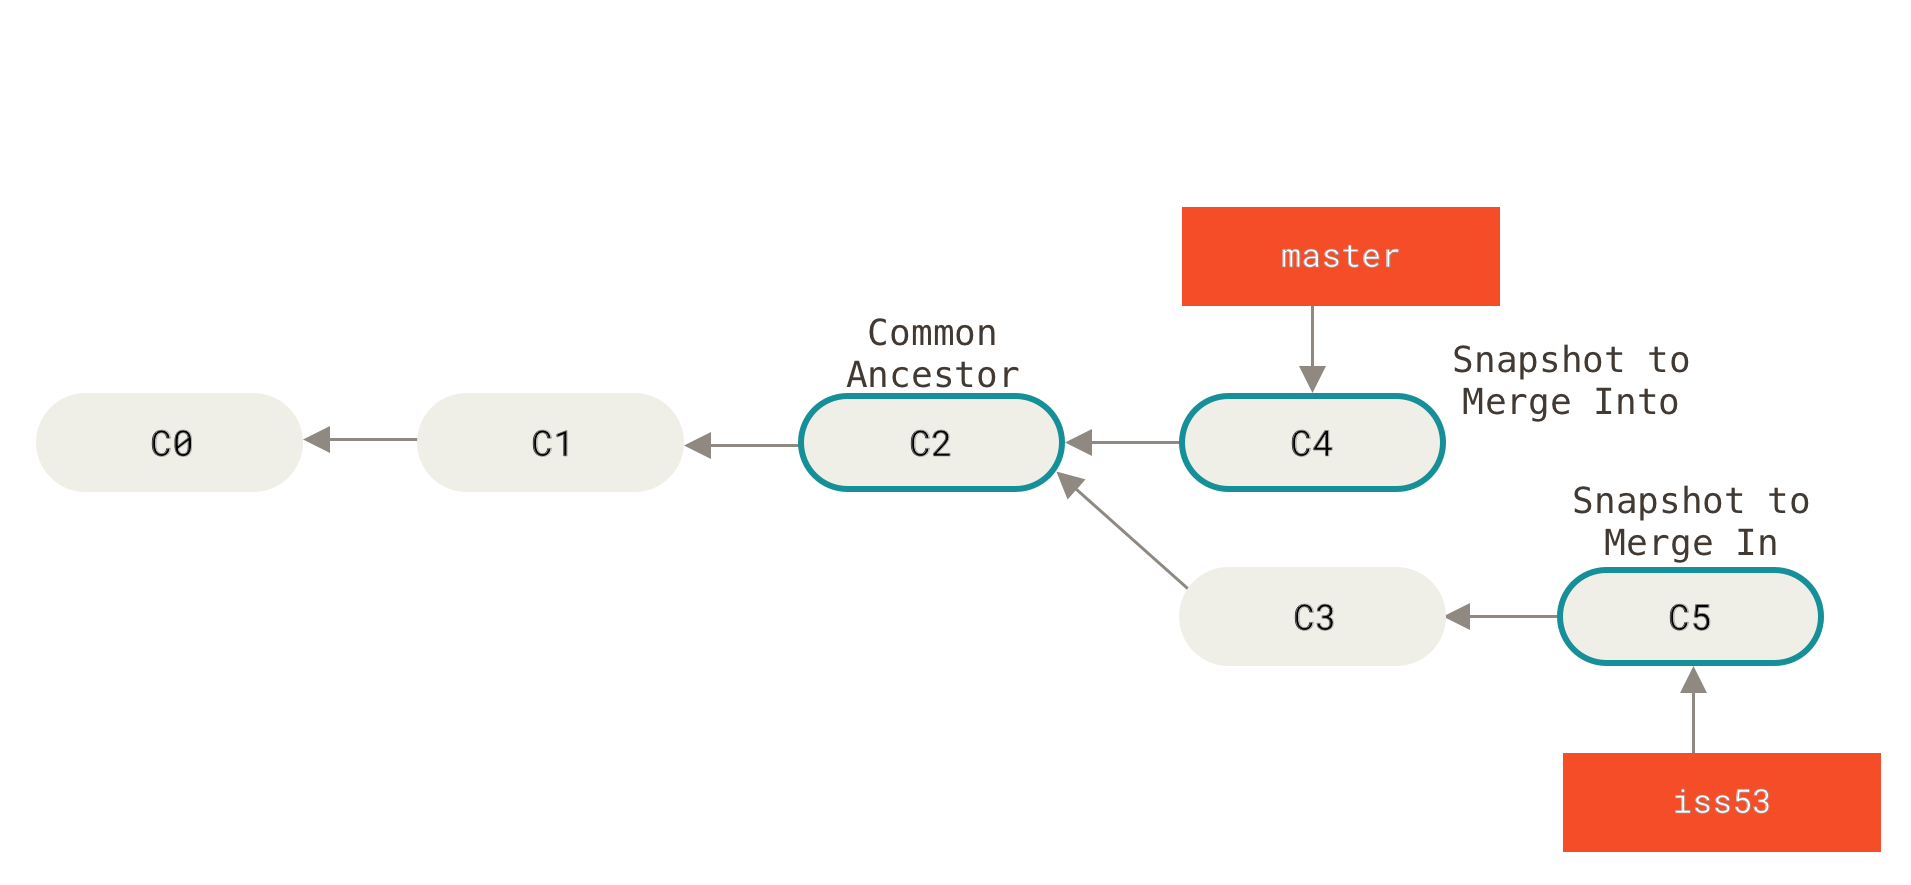
Git 不只是移動分支指標,而是建立一個新的快照,該快照來自此三向合併,並自動建立一個指向它的新提交。這稱為合併提交,其特殊之處在於它有多個父提交。
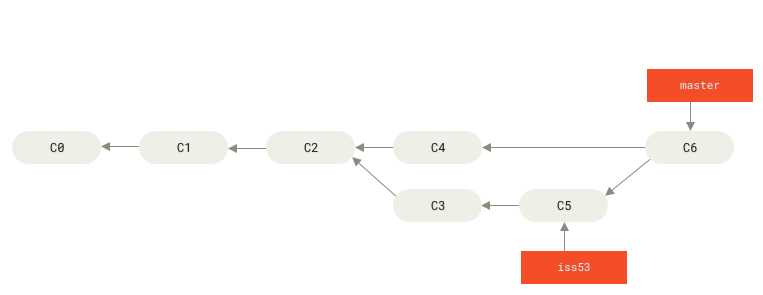
現在你的工作已合併進來,你不再需要 iss53 分支。你可以在你的問題追蹤系統中關閉該問題,並刪除該分支。
$ git branch -d iss53基本合併衝突
有時,此過程並非順利進行。如果你在要合併的兩個分支中,以不同的方式更改了同一個檔案的同一部分,Git 將無法順利合併它們。如果你的問題 #53 的修復程式碼修改了與 hotfix 分支相同的檔案部分,你將會遇到類似以下的合併衝突。
$ git merge iss53
Auto-merging index.html
CONFLICT (content): Merge conflict in index.html
Automatic merge failed; fix conflicts and then commit the result.
Git 並未自動建立新的合併提交。它在您解決衝突時暫停了該過程。如果你想查看在合併衝突後,哪些檔案在任何時間點都未合併,你可以執行 git status。
$ git status
On branch master
You have unmerged paths.
  (fix conflicts and run "git commit")

Unmerged paths:
  (use "git add <file>..." to mark resolution)

    both modified:      index.html

no changes added to commit (use "git add" and/or "git commit -a")
任何具有合併衝突且尚未解決的項目都會列為未合併。Git 會將標準的衝突解決標記新增到具有衝突的檔案中,因此你可以手動開啟它們並解決這些衝突。你的檔案包含一個類似以下的區塊:
<<<<<<< HEAD:index.html
<div id="footer">contact : email.support@github.com</div>
=======
<div id="footer">
 please contact us at support@github.com
</div>
>>>>>>> iss53:index.html
這表示 HEAD 中的版本(你的 master 分支,因為這是你在執行合併命令時簽出的分支)是該區塊的頂部(======= 上方的所有內容),而你的 iss53 分支中的版本看起來像是底部的所有內容。為了解決衝突,你必須選擇其中一方或合併內容。例如,你可以透過將整個區塊替換為以下內容來解決此衝突:
<div id="footer">
please contact us at email.support@github.com
</div>
此解決方案包含每個區段的部分內容,並且 <<<<<<<、======= 和 >>>>>>> 行已完全移除。在你解決每個衝突檔案中的每個區塊之後,請對每個檔案執行 git add,以將其標記為已解決。暫存該檔案會將其標記為 Git 中已解決的檔案。
如果你想使用圖形工具來解決這些問題,你可以執行 git mergetool,它會啟動一個適當的可視化合併工具,並引導你完成衝突解決程序。
$ git mergetool

This message is displayed because 'merge.tool' is not configured.
See 'git mergetool --tool-help' or 'git help config' for more details.
'git mergetool' will now attempt to use one of the following tools:
opendiff kdiff3 tkdiff xxdiff meld tortoisemerge gvimdiff diffuse diffmerge ecmerge p4merge araxis bc3 codecompare vimdiff emerge
Merging:
index.html

Normal merge conflict for 'index.html':
  {local}: modified file
  {remote}: modified file
Hit return to start merge resolution tool (opendiff):
如果你想使用預設工具以外的合併工具(在本例中,Git 選擇 opendiff,因為該命令是在 macOS 上執行的),你可以看到「下列工具之一」後面列出的所有支援工具。只需輸入你想要使用的工具名稱即可。
|
注意
|
如果你需要更進階的工具來解決棘手的合併衝突,我們將在 進階合併 中介紹更多關於合併的內容。 |
在你退出合併工具後,Git 會詢問你合併是否成功。如果你告訴腳本合併已成功,它會暫存該檔案,以將其標記為已為你解決。你可以再次執行 git status 來確認所有衝突都已解決。
$ git status
On branch master
All conflicts fixed but you are still merging.
  (use "git commit" to conclude merge)

Changes to be committed:

    modified:   index.html
如果你對此感到滿意,並且你確認所有發生衝突的內容都已暫存,你可以輸入 git commit 來完成合併提交。預設的提交訊息如下所示:
Merge branch 'iss53'

Conflicts:
    index.html
#
# It looks like you may be committing a merge.
# If this is not correct, please remove the file
#	.git/MERGE_HEAD
# and try again.


# Please enter the commit message for your changes. Lines starting
# with '#' will be ignored, and an empty message aborts the commit.
# On branch master
# All conflicts fixed but you are still merging.
#
# Changes to be committed:
#	modified:   index.html
#
如果你認為將來查看此合併的其他人會有幫助,你可以修改此提交訊息,其中包含有關你如何解決合併的詳細資訊,並解釋你為什麼要進行這些變更(如果這些變更不明顯)。